Author Topic: 1987 K75S restoration...this one's gonna be "fun".  (Read 66528 times)

Offline Romonobyl

  • Probably in over my head.
  • Motobrick Curious
  • Posts: 35
1987 K75S restoration...this one's gonna be "fun".
« on: December 17, 2024, 07:34:22 PM »
As I already over-covered in my "hey it's the new guy" post, I have a 1987 K75S that I bought new, rode regularly until around 1994 before putting into storage. It's sat untouched in my garage ever since...until now.
I'm now a retired empty-nester and my wife and I will be moving before long so I guess it's time to get this thing back on it's wheels again. I had already removed the tank and all the bodywork years ago to fix some frame rust and they'll be needing a respray, which is unfortunate as apparently the Lava Red paint color is a pretty rare find that was only offered in 1987. Regardless, it's time to set up shop:


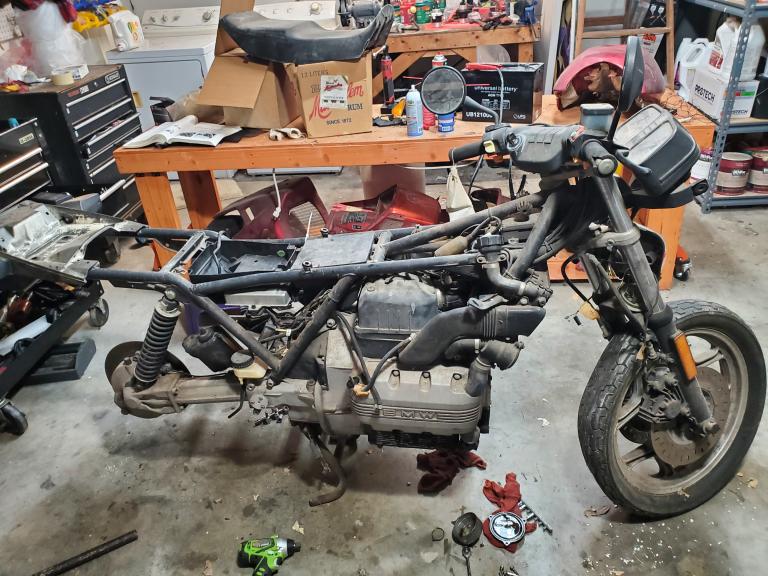
* Getting Started.jpg (100.29 kB . 768x576 - viewed 966 times)

The body parts will be the last priority, obviously I have to get the mechanicals squared away first. Somehow a few of the fiberglass parts got cracked so that will all need repair before painting. They'll stay out of the way for now.


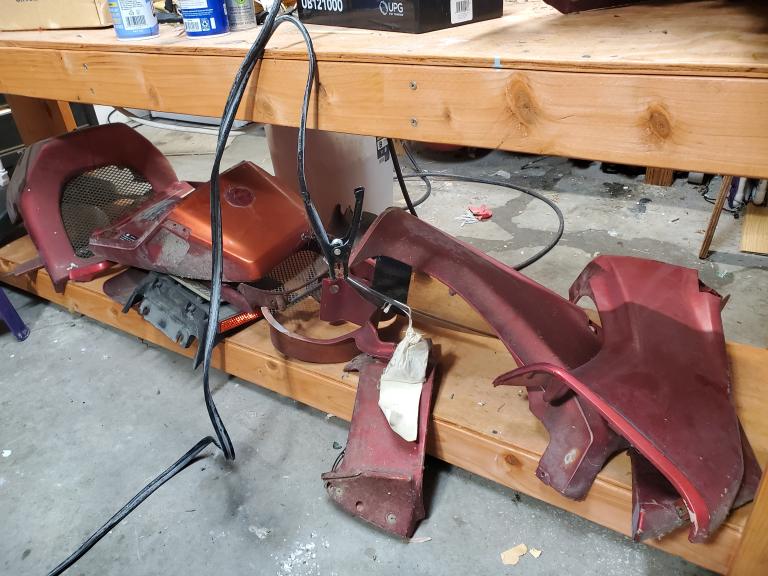
* Body Parts.jpg (76 kB . 768x576 - viewed 1018 times)

The first priority is getting the engine running, fortunately I sprayed the cylinders down with oil prior to hibernation so the engine spins freely. I played it safe and changed the oil and filter, good thing because the old stuff was thick as gear oil. I also drained the coolant and replaced it with a gallon of distilled water for now. I already knew the fuel pump was bad, so I ordered a new kit with hoses and filter. While waiting for that I did an inventory of what else was in need of attention. Both master cylinders were shot and the rear one was seized, so I started with that. The screws securing the MC to the foot peg mount were stuck solid, I removed the entire bracket but I couldn't even impact them loose. I feared this would be a harbinger of things to come but pressed on. I decided to disassemble the cylinder in-situ, and big surprise that wasn't happening either.


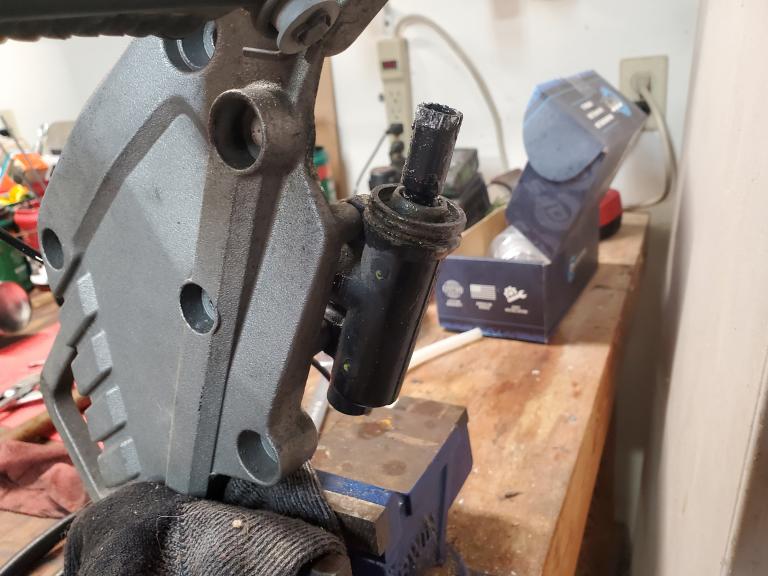
* 20241209_161641.jpg (59.34 kB . 768x576 - viewed 951 times)

I soaked it with penetrant for days and finally got the guts to free up enough to hammer out with a small punch. Yuck...


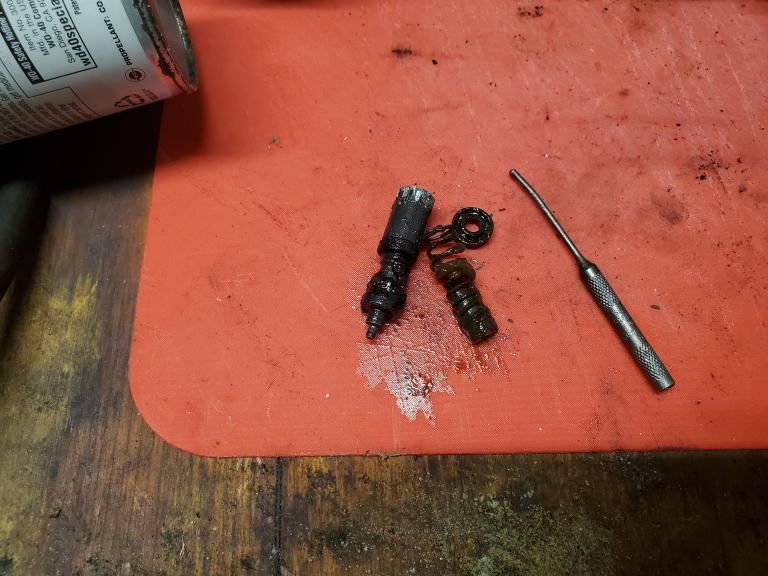
* Unseized.jpg (66.27 kB . 768x576 - viewed 997 times)

It's the dreaded 13mm Magura unit so replacement will be a challenge. Motobrick to the rescue as I found several posts here with "alternative" options using generic master cylinders. I'll give the original cylinder a good inspection to see if it's even salvageable, if not it's fabrication time. Fortunately the caliper itself, although leaking, came right apart and just looks like it needs new seals. Well that's a little hope at least but forget that for now because THE FUEL PUMP IS HERE!!!


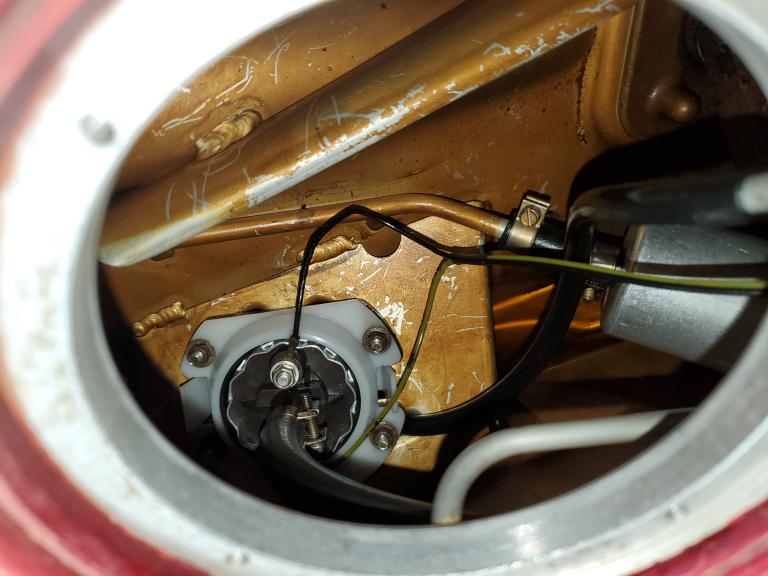
* 20241216_205456.jpg (55.76 kB . 768x576 - viewed 941 times)

It went together easily enough, more to follow. Thanks for reading.
  • Texas Coastal Bend
  • 1986 K75S

Offline natalena

  • ^ SuperNatural Motobricker
  • Posts: 742
Re: 1987 K75S restoration...this one's gonna be "fun".
« Reply #1 on: December 17, 2024, 11:25:33 PM »
Congrats on the progress. While the tank is off, it's a great time to install a heat barrier to the bottom of the tank. Cheers
  • MST
  • 1987 K75s #0919, '05 Sportster 1200C, '21 ARGO 8x8, '24 KLR650
"Hard to beat a 10x beaver, 'specially if you're gonna work it."
Agree Agree x 1 View List

Offline Romonobyl

  • Probably in over my head.
  • Motobrick Curious
  • Posts: 35
Re: 1987 K75S restoration...this one's gonna be "fun".
« Reply #2 on: December 18, 2024, 12:36:02 AM »
With the new pump and filter in place I temporarily reinstalled the tank and attached the fuel lines. I have an RV battery that stays on a trickle charger in my garage which I used with some jumper cables as a 12VDC power source. With everything hooked up, a little gas in the tank and a fire extinguisher within easy reach, I turned the key and was pleased to see the dash light up for the first time in 30ish years. I assumed (wrongly) that the fuel pump would power up with the key in the "RUN" position, but no luck. After wasting a day poring over the wiring diagram and chasing wires with a multimeter, I suddenly remembered that this was a BMW motorcycle. Yeah, gotta push the start button so I held my breath and gave that a try. The engine spun nicely as did the fuel pump, so far so good. I had already disconnected the hose from the fuel rail that goes to the regulator and attached a length of rubber tubing to the rail and put the other end in a drain pan. That way any crud will be flushed clear before it gets to the injectors (I'm not kidding myself into thinking those won't need attention). The gas flowed freely so I reattached the hose to the regulator just to see what would happen and tried again. Needless to say every inch of rubber tubing on this thing is harder than my arteries and the lines to the tank are no exception, the line feeding the fuel rail had several pinholes that showed up immediately. The next day I picked up a foot of fuel injector hose from an auto parts store and tried again. The engine turned sluggishly and the fuel pump stayed silent. I wasted more time troubleshooting before realizing the problem was with my battery. The RV battery is a deep cycle unit that offers very little in the way of cranking amps, I needed a  proper car (or motorcycle) battery to do this right.
I already have a good AGM battery on my wish list, but that investment can wait until I'm sure this thing can be saved. I want a cheapo battery for now but don't like what's available locally, so I have yet a few more days to kill before the new one arrives. I think I'll start tearing apart the front brakes to see what they have in store.
I started this project before thinking about creating a build thread so I didn't take that many pictures. From here on I'll start taking a lot more because that's a lot more interesting than reading my tiresome blathering. I already noticed a wiring issue that hopefully won't be a trend. Here's a teaser:


* Bad Connector.jpg (69.15 kB . 768x576 - viewed 991 times)

* Disintegrated.jpg (42.98 kB . 768x576 - viewed 985 times)

  • Texas Coastal Bend
  • 1986 K75S

Offline Laitch

  • Faster than a speeding pullet
  • Administrator
  • ^ Quintessential Motobricker
  • Posts: 11299
Re: 1987 K75S restoration...this one's gonna be "fun".
« Reply #3 on: December 18, 2024, 09:48:40 AM »
I already have a good AGM battery on my wish list, but that investment can wait until I'm sure this thing can be saved. I want a cheapo battery for now but don't like what's available locally, so I have yet a few more days to kill before the new one arrives.
A cheapo battery will work ok. The AGM in the photo from Battery Mart lasted me over 9 years then I bought another. The Brick is stored in an unheated shop for six months in winter temperatures sometimes dropping below zero for days at a time with its transmission battery ground strap disconnected. In spring it starts right up. The Brick is stored with a full tank of STA-BIL-conditioned fuel; the battery has been charged up during the last ride of the season before it's disconnected.


I suggest cleaning the fuel tank's interior with a white vinegar solution to rid it of the varnish that is apparent and any other crud that could be lurking. Download the LE Jetronic training manual at the link on this page for a helpful descriptionof the engine management system.

Progress is looking good!
  • Along the Ridley in Vermont.
  • 1995 K75 89,000 miles
Agree Agree x 3 View List

Offline natalena

  • ^ SuperNatural Motobricker
  • Posts: 742
Re: 1987 K75S restoration...this one's gonna be "fun".
« Reply #4 on: December 18, 2024, 06:30:32 PM »
Sending your injectors now to "Mr. Injector" will give you a jump on the reassembly delta. Thier turn around is good, but nobody likes waiting for a part to complete an assembly stage, so having it on the bench is nice. Cheers
  • MST
  • 1987 K75s #0919, '05 Sportster 1200C, '21 ARGO 8x8, '24 KLR650
"Hard to beat a 10x beaver, 'specially if you're gonna work it."
Agree Agree x 2 View List

Offline stokester

  • ^ SuperNatural Motobricker
  • Posts: 847
Re: 1987 K75S restoration...this one's gonna be "fun".
« Reply #5 on: December 18, 2024, 06:50:32 PM »
Sending your injectors now to "Mr. Injector" will give you a jump on the reassembly delta. Thier turn around is good, but nobody likes waiting for a part to complete an assembly stage, so having it on the bench is nice. Cheers
112350 112350 112350
  • Yorktown Virginia
  • '94 K75S Dakar Yellow - '93 K75S Seiden Blau - '91 R100RT Bermuda Blue- '78 R100S Smoke Red

Offline Romonobyl

  • Probably in over my head.
  • Motobrick Curious
  • Posts: 35
Re: 1987 K75S restoration...this one's gonna be "fun".
« Reply #6 on: December 18, 2024, 09:30:30 PM »
Sending your injectors now to "Mr. Injector" will give you a jump on the reassembly delta. Thier turn around is good, but nobody likes waiting for a part to complete an assembly stage, so having it on the bench is nice. Cheers

Yep, that one is on my "to do" list. I've been debating between that or just buying new, upgraded 4-hole injectors from Euromotoelectrics. I'll probably stick with the stock parts and get them refurbished as you mentioned, but I need to make sure this thing will even be salvageable after sitting for so long before investing too much more cash into it.

On that note, for those who have performed a similar project what might I expect as far as problems relating to the lengthy downtime? I've already found one electrical connector that has completely disintegrated, I have the sinking feeling that the electricals are going to give me the most grief which unfortunately isn't my strong point. Time will tell I guess.

Again, thanks to everyone for all the current and future advice, I only hope that the things I discover will eventually help someone else in the future.
  • Texas Coastal Bend
  • 1986 K75S

Offline Romonobyl

  • Probably in over my head.
  • Motobrick Curious
  • Posts: 35
Re: 1987 K75S restoration...this one's gonna be "fun".
« Reply #7 on: December 18, 2024, 09:41:24 PM »
I almost forgot, the mileage is pretty low for such an old machine, but the long idle time probably did more damage than a lot of miles.


* Mileage.jpg (91.65 kB . 768x576 - viewed 782 times)
  • Texas Coastal Bend
  • 1986 K75S

Offline daveson

  • ^ Quintessential Motobricker
  • Posts: 1268
Re: 1987 K75S restoration...this one's gonna be "fun".
« Reply #8 on: December 19, 2024, 03:51:13 AM »
I'm not sure I agree one hundred percent on the detective work there on the mileage. When I see mileage at 777.7 or something close to that (and 8 is about as close to 7 as you can get) I'm thinking maybe one of the cogs inside there has got the odd broken bit, and got stuck. Then the actual mileage is a bit of a lucky dip. And the numbers don't line up too good either. It could be a coincidence, hopefully I'm wrong, but it's a good buy regardless. If you turn the knob, hopefully it resets to 0 and it's good.
 
  • Victoria, Australia
  • Current; '85 K100RT~100,000km; four other bricks. Past; Vulcan 1500, V Star 650, KLX 250(dirt bike) TT250(dirt bike)

Offline Laitch

  • Faster than a speeding pullet
  • Administrator
  • ^ Quintessential Motobricker
  • Posts: 11299
Re: 1987 K75S restoration...this one's gonna be "fun".
« Reply #9 on: December 19, 2024, 06:36:27 AM »
When I see mileage at 777.7 or something close to that (and 8 is about as close to 7 as you can get) I'm thinking maybe one of the cogs inside there has got the odd broken bit, and got stuck.
The problems really start multiplying if the odometer is stuck at 666.0
  • Along the Ridley in Vermont.
  • 1995 K75 89,000 miles
Agree Agree x 1 View List

Offline stokester

  • ^ SuperNatural Motobricker
  • Posts: 847
Re: 1987 K75S restoration...this one's gonna be "fun".
« Reply #10 on: December 19, 2024, 07:14:49 AM »
As long as you are doing a basic refurbishment...  Based on my experience with a '93 and '94 I would replace the water pump seal (along with the o-rings) and check the pump shaft regardless of the mileage.

I say this because my regularly ridden '93 at about 50k started to drip from the weep hole and my '94 which had been stored for a number of years did the same with only about 10k on the clock.  While the procedure is not difficult it is not uncommon to have to repeat the process if not done correctly, been there.  Lots of good information on this site.

Others may chime in about the impeller change over the years.  I'm unfamiliar with the earlier version as both of mine have the later stamped one.
  • Yorktown Virginia
  • '94 K75S Dakar Yellow - '93 K75S Seiden Blau - '91 R100RT Bermuda Blue- '78 R100S Smoke Red
Agree Agree x 1 View List

Offline PitchlerBrick

  • ^ Motobrick Curious
  • Posts: 52
Re: 1987 K75S restoration...this one's gonna be "fun".
« Reply #11 on: December 20, 2024, 12:19:07 AM »
112350 112350 112350
The three new injectors I ordered from www.osidetiger.net have performed well. They are higher efficiency compared to OEM. It's a father and son operation. The guy I spoke with on the phone (dad or lad?) was helpful and knowledgeable, and the injectors shipped promptly.
  • Garaged & Covered, Central Texas
  • '93 K75S w/Pitchler Fairing, Tri-Spoke, Corbin, 50 Amp Alt., OsideTiger Injectors, Catz XLO Lamps w/Auto Switch, Flip-A-Lever Cruise, Hyper-Lite rear brake flasher, OEM Luggage Rack
Agree Agree x 1 View List

Offline natalena

  • ^ SuperNatural Motobricker
  • Posts: 742
Re: 1987 K75S restoration...this one's gonna be "fun".
« Reply #12 on: December 20, 2024, 02:53:20 AM »
On that note, for those who have performed a similar project what might I expect as far as problems relating to the lengthy downtime?
Although not as extensive as your undertaking, the '87 K75S got a nice teardown and systems check within our Montana winter, and was ready for the Beartooth Highway opening. Good luck! Cheers
  • MST
  • 1987 K75s #0919, '05 Sportster 1200C, '21 ARGO 8x8, '24 KLR650
"Hard to beat a 10x beaver, 'specially if you're gonna work it."
Agree Agree x 1 View List

Offline Romonobyl

  • Probably in over my head.
  • Motobrick Curious
  • Posts: 35
Re: 1987 K75S restoration...this one's gonna be "fun".
« Reply #13 on: December 21, 2024, 11:25:58 PM »

* Battery.jpg (65.45 kB . 768x576 - viewed 675 times)

Battery is here, it showed up fully charged but I'll keep it on the maintenance charger until I'm ready to install it. We're hosting for the holidays so I've been busy cooking and such, should be back on it in a few days. I couldn't help but noticed they didn't paint the polarity marks on the case like in the pictures on Amazon, but at least they're molded near the posts.

One issue that I already alluded to is the 5-pin connector for the hall effect sensor, for some reason it completely disintegrated when touched.


* Bad Connector.jpg (69.15 kB . 768x576 - viewed 755 times)

* Disintegrated.jpg (42.98 kB . 768x576 - viewed 660 times)

I have the pins temporarily inserted into the female plug and protected with electrical tape until I figure out a permanent repair. I'm considering a molex connector for the core conductors and a separate bullet-style plug for the braided shielding, fortunately there is plenty of slack in the harness to play with. If the molex idea is a no-go I might create a mold and encase the pins in epoxy, but not until I get the engine running.

Like I said...this one's gonna be fun.
  • Texas Coastal Bend
  • 1986 K75S

Offline Romonobyl

  • Probably in over my head.
  • Motobrick Curious
  • Posts: 35
Re: 1987 K75S restoration...this one's gonna be "fun".
« Reply #14 on: December 21, 2024, 11:28:10 PM »
Although not as extensive as your undertaking, the '87 K75S got a nice teardown and systems check within our Montana winter, and was ready for the Beartooth Highway opening. Good luck! Cheers

That's good to know, maybe there's hope after all. That's a very clean-looking machine.
  • Texas Coastal Bend
  • 1986 K75S

Offline frankenduck

  • Adrninistrator
  • ^ Quintessential Motobricker
  • Posts: 5511
Re: 1987 K75S restoration...this one's gonna be "fun".
« Reply #15 on: December 22, 2024, 09:49:07 AM »
Four hole injectors are not an upgrade.  I've tried them in both 2V and 4V bikes and although they are cleverly marketed and they do work they do not make any difference. If anything, since there are four smaller holes instead of one larger one, they are probably more prone to clogging.

Nobody who sells them has ever posted dyno charts or any other objective data to substantiate claims of better mileage or performance.

After trying the four holes, I've gone back to using Mr. Injector for the OEM injectors that the motors are designed to use.
Once I had a Collie pup. Dug a hole and covered him up. Now I sit there by the hour. Waiting for a Collie-flower.
New to K bikes? Click here.
K Bike Maintenance & Mods: Click here.
Buy parts here.
Agree Agree x 3 View List

Offline natalena

  • ^ SuperNatural Motobricker
  • Posts: 742
Re: 1987 K75S restoration...this one's gonna be "fun".
« Reply #16 on: December 22, 2024, 11:37:09 AM »
https://www.amazon.com/gp/aw/d/B01FP1HXJ4?psc=1&ref=ppx_pop_mob_b_asin_title
I've had success with these connections, on the brick and other XTV/ATV. 5 years, and can still hose off the mud without wierd shorting issue's. Cheers
  • MST
  • 1987 K75s #0919, '05 Sportster 1200C, '21 ARGO 8x8, '24 KLR650
"Hard to beat a 10x beaver, 'specially if you're gonna work it."
Agree Agree x 1 View List

Offline Romonobyl

  • Probably in over my head.
  • Motobrick Curious
  • Posts: 35
Re: 1987 K75S restoration...this one's gonna be "fun".
« Reply #17 on: December 22, 2024, 04:21:42 PM »
https://www.amazon.com/gp/aw/d/B01FP1HXJ4?psc=1&ref=ppx_pop_mob_b_asin_title
I've had success with these connections, on the brick and other XTV/ATV. 5 years, and can still hose off the mud without wierd shorting issue's. Cheers

I was digging through my stash and came across some old GM Weatherpack connectors from a past project, which are pretty much the same thing. Unfortunately these came prewired with pigtails and I'd rather not use splices if I can avoid them, so I'll probably get a kit like what you linked. I think I even have the proper crimping tool for the prongs, and of course a soldering iron just in case.
  • Texas Coastal Bend
  • 1986 K75S

Offline Romonobyl

  • Probably in over my head.
  • Motobrick Curious
  • Posts: 35
Re: 1987 K75S restoration...this one's gonna be "fun".
« Reply #18 on: December 22, 2024, 05:48:01 PM »
I got to spend some quality time in the garage today so went ahead and installed the battery. I left the wire off the the starter so I could ops check the fuel pump but it didn't come on when I pushed the start button. I reconnected the starter and gave that a try, it worked much better than the previous deep-cycle battery. I couldn't hear if the fuel pump was coming on or not over the noise of the engine cranking so I tried again with the starter wire disconnected, this time the pump happily whirred away...go figure.
I checked the voltage at the fuse for the pump while the starter was engaged and it was about 11 volts, which should be enough. The battery ground also checked OK but I think I'll still replace it with a more substantial wire, chasing electrical gremlins are par for the course after this much downtime. What I need to do is plumb a pressure gauge into the line from the tank to the fuel rail, there's no point in troubleshooting much further until I know I have a reliable fuel supply.

Speaking of electrical gremlins...


* Bodge.jpg (48.27 kB . 768x576 - viewed 687 times)

That's what's left of the 5-pin plug for the hall effect sensor, and my janky (but temporary) repair. Oddly enough the ICU half of the connector is perfectly fine, but the other half on the HES harness crumbled into dust. This might have something to do with another problem I uncovered...no spark. I pulled the #3 plug and held it to ground while cranking, no luck. Once I get the fuel situation squared away that will be the next hurdle, something tells me I'll need to brush up on my knowledge of hall effect sensors. Points and condensers I can understand, but this should be a bit more challenging. I only wish I could get ahold of some of the diagnostic equipment that BMW designed for these bikes ages ago, but that's beyond unlikely. I just hate the idea of firing the parts cannon at this thing, especially since that's some very expensive ammo.

Looks like it's gonna be just me, my multimeter, some limited knowledge and a whole bunch of research...once again wish me luck.
  • Texas Coastal Bend
  • 1986 K75S

Offline Romonobyl

  • Probably in over my head.
  • Motobrick Curious
  • Posts: 35
Re: 1987 K75S restoration...this one's gonna be "fun".
« Reply #19 on: December 23, 2024, 10:15:14 AM »
I'm not sure I agree one hundred percent on the detective work there on the mileage. When I see mileage at 777.7 or something close to that (and 8 is about as close to 7 as you can get) I'm thinking maybe one of the cogs inside there has got the odd broken bit, and got stuck. Then the actual mileage is a bit of a lucky dip. And the numbers don't line up too good either. It could be a coincidence, hopefully I'm wrong, but it's a good buy regardless. If you turn the knob, hopefully it resets to 0 and it's good.

The knob for the trip odometer is missing. I don't remember the story behind that, it might have been broken off some time while moving stuff around it the garage, but as far as the actual mileage goes there's really no "detective work" involved as I've owned the bike since new. My much younger and more durable butt experienced every one of those miles all those years ago.
  • Texas Coastal Bend
  • 1986 K75S

Offline daveson

  • ^ Quintessential Motobricker
  • Posts: 1268
Re: 1987 K75S restoration...this one's gonna be "fun".
« Reply #20 on: December 23, 2024, 03:07:36 PM »
True.

When I saw almost all of the ducks lined up at seven, I thought, probably not a coincidence (since the numbers are struggling to turn) probably the odo and trip meter have stopped working, and probably stopped working before it was parked. Then the actual mileage would be higher than the reading.

The hundreds column and the tens column, they're trying really hard to turn to eight, but they just can't seem to make it. The units column probably just made it over the hill, and sits comfortably at eight. The tenths column gave up early. It was probably thinking "if the big boys can't do it, why should I even try?"

 Anyway it's a tiny issue, I've seen bricks with 400,000 clicks.
  • Victoria, Australia
  • Current; '85 K100RT~100,000km; four other bricks. Past; Vulcan 1500, V Star 650, KLX 250(dirt bike) TT250(dirt bike)

Offline Kaos

  • Vlad the Extractor
  • ^ Proficient Motobricker
  • Posts: 241
Re: 1987 K75S restoration...this one's gonna be "fun".
« Reply #21 on: December 25, 2024, 07:13:31 AM »
Seems like a nice project.
Ive been doing some internets for you.
And if you find a good car/motorcycle Paint Shop you can provide them with BMW Paint Code 575, metallic.
 they should be able to mix it for you.
  • Basically Everywhere
  • 1988 K100 RT; 1988 K100 LT; 1989 K 100 LS
"When Kaos reigns, bolts shall break" - Vlad the extractor, 2024
Agree Agree x 1 View List

Offline Romonobyl

  • Probably in over my head.
  • Motobrick Curious
  • Posts: 35
Re: 1987 K75S restoration...this one's gonna be "fun".
« Reply #22 on: December 25, 2024, 11:41:30 AM »
True.

When I saw almost all of the ducks lined up at seven, I thought, probably not a coincidence (since the numbers are struggling to turn) probably the odo and trip meter have stopped working, and probably stopped working before it was parked. Then the actual mileage would be higher than the reading.

The hundreds column and the tens column, they're trying really hard to turn to eight, but they just can't seem to make it. The units column probably just made it over the hill, and sits comfortably at eight. The tenths column gave up early. It was probably thinking "if the big boys can't do it, why should I even try?"

 Anyway it's a tiny issue, I've seen bricks with 400,000 clicks.

I think that whatever snapped the knob off also partially turned it and moved the numbers, I was able to use a small screwdriver to rotate what was left of the shaft which lined all the numbers up and reset to zero just like normal.
I used the odometer all the time to track fuel usage as I don't have a gauge and didn't want to rely on the light, so I'm sure it was working up to the time I stopped riding. That's the correct mileage.
  • Texas Coastal Bend
  • 1986 K75S
Agree Agree x 1 View List

Offline daveson

  • ^ Quintessential Motobricker
  • Posts: 1268
Re: 1987 K75S restoration...this one's gonna be "fun".
« Reply #23 on: December 25, 2024, 02:40:06 PM »
Goodo! Bonus, so it wasn't just with the tenths column that I was overthinking it. I've got a black brick with the trip meter stuck at 444.4 km. Unfortunately turning the knob doesn't change anything, and the odo has also stopped working. Hopefully this thread might inspire me to have a sticky beak inside the cluster in the hope of finding a simple fix.
  • Victoria, Australia
  • Current; '85 K100RT~100,000km; four other bricks. Past; Vulcan 1500, V Star 650, KLX 250(dirt bike) TT250(dirt bike)

Offline Romonobyl

  • Probably in over my head.
  • Motobrick Curious
  • Posts: 35
Re: 1987 K75S restoration...this one's gonna be "fun".
« Reply #24 on: December 25, 2024, 03:31:34 PM »
One day I might seek out a module being sold for parts so I can replace the knob, but that's obviously a low priority. While I'm in there I'll see about getting the LCD replaced for the gear indicator, that started acting wonky well before I put the bike in storage.
  • Texas Coastal Bend
  • 1986 K75S